New Site

I have started a new hosted domain and have moved all the content to that site. No further updates will be done to this site.

New Site Url: http://www.srinichekuri.com/

Thanks for all the love and encouragement for this site. This has served as good foundation for me.

Please see my new site and pass on your suggestions/comments.

thanks,

-Srini.

Building RESTful Web Services with JAX-RS – Annotations

Post moved to

http://srinichekuri.com/2016/01/17/building-restful-web-services-with-jax-rs-annotations/

**********************************************************************

Let’s take a look at annotations that are used to build RESTful services. Based on the implementation framework that you are using, there might be many annotations. In this post we will discuss annotations that are supported by JAX-RS specs only.

@Path

  • @Path annotation identifies URI Path template
  • Can be used at class or method level.
  • Always specifies relative url to base url (host)
  • @Path value need not have leading or tailing slashes (/). JAX-RS treats them them the same either ways
  • Variables can be specified in @path as follows 
    • Multiple Variables can be specified. Eg @Path(“/users/{username_1}/{username_2}”)


//Variable in path is specified by {}
@Path("/users/{username}")
public class UserResource {

    @GET
    @Produces("text/xml")
    //variable specified in @Path can be accessed by @PathParam
    public String getUser(@PathParam("userName") String userName) {
        ...
    }
}


Request Method Designator Annotations (@GET, @POST, @PUT, @DELETE and @HEAD):

  • @GET – The Java method annotated with this will process HTTP GET requests.
  • @POST – The Java method annotated with this will process HTTP POST requests.
  • @PUT – The Java method annotated with this will process HTTP PUT requests.
  • @DELETE – The Java method annotated with this will process HTTP DELETE requests.
  • @HEAD – The Java method annotated with this will process HTTP HEAD requests.

Few logistics that should be followed to use JAX-RS for request methods designator annotations are as follows

  • Methods decorated with request method designators must return following:
    • void
    • A Java programming language type
    • A javax.ws.rs.core.Response Object.
  • Multiple parameters may be extracted from the URI using @PathParam or @QueryParam (Explained below).
  • The HTTP PUT and POST methods expect an HTTP request body.
  • Both @PUT and @POST can be used to create or update a resource.
  • POST can mean anything, so any semantics can be used. PUT has well defined semantics.When using PUT for creation, the client declares the URI for the newly created resource.
  • A common pattern is to use POST to create a resource and return a 201 response with a location header value is the URI to the newly created resource. In this pattern, the web service declares the URI for the newly created resource.

@Consumes and @Produces

@Produces annotation is used to specify the MIME media type that are sent back to client.

  • If specified on class level, all methods will follow it.
  • One can override class level by specifying this on method level.
  • If no methods in a resource are able to produce the MIME type in a client request, then JAX-RS runtime sends back an HTTP ‘406 Not Acceptable’ error.
  • Multiple MIME-types can be specified as follows
      • @Produces({“image/jpeg,image/png”})


@Path("/myResource")
@Produces("text/plain")
public class SomeResource {
    @GET
    public String doGetAsPlainText() {
        ...
    }

    @GET
    @Produces("text/html") //overides class level
    public String doGetAsHtml() {
        ...
    }
}


@Consumes represents the media types a resource  can accept.

  • If specified on class level, all methods will follow it.
  • One can override class level by specifying this on method level.
  • If a resource is unable to consume the MIME type of a client request, the JAX-RS runtime sends back an HTTP “415 (‘Unsupported Media Type’)” error.
  • If @consumes is used on method that returns ‘void’ then HTTP 204 (‘No Content’) error is returned.

    @POST@Consumes(“text/plain”)public void postClichedMessage(String message) {    // Store the message }

@Path("/myResource")
@Consumes("multipart/related")
public class SomeResource {
    @POST
    public String doPost(MimeMultipart mimeMultipartData) {
        ...
    }

    @POST
    @Consumes("application/x-www-form-urlencoded")
    public String doPost2(FormURLEncodedProperties formData) {
        ...
    }
}


Request Parameters (@QueryParam, @PathParam, @DefaultValue, @MatrixParam, @HeaderParam, @CookieParam, @FormParam)

Both @QueryParam and @PathParam can be used only on following Java types:

  • All primitive types except char.
  • All wrapper classes of primitive types except Character
  • Any class with a constructor that accepts a single String argument.
  • Any class with static method named valueOf (String) that accepst a single String argument
  • List<T>, Set<T> or SortedSet<T>, where T matches the already listed criteria.


@Path(&quot;smooth&quot;)
@GET
public Response smooth(
        @DefaultValue(&quot;4&quot;) @QueryParam(&quot;number&quot;) int colorNumber,
        @DefaultValue(&quot;red&quot;) @QueryParam(&quot;last-color&quot;) String color
        ) { ... }

Building RESTful Web Services with JAX-RS – Introduction

Post moved to

http://srinichekuri.com/2016/01/17/building-restful-web-services-with-jax-rs-introduction/

**********************************************************************

Introduction to REST:

REST Stands for REpresentational State Transfer. REST  is built to work best in web and uses a stateless communication protocol, typically HTTP. Following principles make RESTful application simple, lightweight and fast.

  • URIs are used to identify resources (services).
  • Uniform Indentification for CRID activities
    • Create – PUT
    • Read – GET
    • Update – POST
    • Delete – DELETE
  • Resources (Services) are decoupled from representation so their content can be accessed in variety of formats. Eg: HTML, Plain Text, XML, JSON etc
  • As Rest Services are Stateless, Stateful interaction can be done by URI rewriting, cookies and hidden fields.

Advantages of REST

  • Better Performance
  • Scalability
  • Modifiability.

Disadvantages of REST

  • Less Secure

<Put in an HelloWorldRest Service here with  text on what annotation means what>

Step by Step guide- Hello World REST Service

Post moved to

http://srinichekuri.com/2016/01/17/step-by-step-guide-hello-world-rest-service/

**********************************************************************

This post is a step by step guide for a Hello world REST Service using JAX-RS. I am using Eclipse (Mars Edition) and Apache Tomcat for this tutorial. Also I am using Maven for build automation. If you are beginner or  if you have not yet configured your workspace then I recommend these links before reading any further.

Apache Wink is used for JAX-RS implementation for this tutorial.

Step 1: Create a new Dynamic Web Application

Create a new dynamic web application (named HelloWorldRest for this tutorial). Also convert the project into ‘Maven Project’ (This is an optional step if you are planning to use Maven).

Step 2: Update dependencies for Apache Wink

Add these dependencies to pom.xml

<dependency>
 <groupId>org.apache.wink</groupId>
 <artifactId>wink-server</artifactId>
 <version>1.4</version>
 </dependency>
 <dependency>
 <groupId>org.apache.wink</groupId>
 <artifactId>wink-common</artifactId>
 <version>1.4</version>
</dependency>

If you are not using Maven then download the following jar version into WEB-INF/lib folder.

activation.jar -> 1.1 Version
commons-lang.jar -> 2.3 Version
geronimo annotation_1.1_spec.jar -> 1.0 Version
geronimo-jaxrs_1.1_spec.jar -> 1.0 Version
jaxb-api.jar -> 2.2 Version
jaxb-impl.jar -> 2.2.1.1 Version
slf4j-api.jar -> 1.6.1 Version
stax-api.jar -> 1.0-2 Version
wink-common.jar -> 1.4 Version
wink-server.jar -> 1.4 Version

Step -3: Add code for REST Service

Add below code for HelloWorldResource


package com.test.helloworld.resource;

import javax.ws.rs.GET;
import javax.ws.rs.Path;

@Path(&quot;/helloworld&quot;)
public class HelloWorldResource {

	@GET
	 public String getMessage() {
		System.out.println(&quot;Returning Message&quot;);
		return &quot;Hello World!&quot;;
	 }
}


Add below code for HelloWorldApplication


package com.test.helloworld;

import java.util.HashSet;
import java.util.Set;

import javax.ws.rs.core.Application;

import com.test.helloworld.resource.HelloWorldResource;

public class HelloWorldApplication extends Application{

	@Override
	 public Set&lt;Class&lt;?&gt;&gt; getClasses() {
		 Set&lt;Class&lt;?&gt;&gt; classes = new HashSet&lt;Class&lt;?&gt;&gt;();
		 classes.add(HelloWorldResource.class);
		 return classes;
	}
}


Add below entries to web.xml

<servlet>
 <servlet-name>HelloWorldApp</servlet-name>
 <servlet-class>org.apache.wink.server.internal.servlet.RestServlet</servlet-class>
 <init-param>
  <param-name>javax.ws.rs.Application</param-name>
  <param-value>com.test.helloworld.HelloWorldApplication</param-value>
 </init-param>
 <load-on-startup>1</load-on-startup>
</servlet>
<servlet-mapping>
  <servlet-name>HelloWorldApp</servlet-name>
  <url-pattern>/rest/*</url-pattern>
</servlet-mapping>

Step-4: Test HelloWorld REST Service

helloworld_rest_service

Step by Step guide – Convert to Maven Project in Eclipse

Post moved to:

http://srinichekuri.com/2016/01/15/step-by-step-guide-convert-to-maven-project-in-eclipse/

**********************************************************************

This post is for step by step guide to convert a single project to Maven project in Eclipse. I recommend going through these links before you read any further.

Step 1: Maven Plugin for Eclipse

First you should make sure that you have Maven Plugin installed in your Eclipse. I am using Eclipse Mars for this demo and this version comes with Maven Plugin. If you are using Eclipse doesn’t have this built in feature then try to install a Maven Plugin. I recommend M2Eclipse Plugin.

Step 2: Convert Java/J2ee Project to Maven Project

Right click on Java Eclipse and select Configure -> Convert to Maven Project.

convert_to_Maven_Project_Eclipse

A popup up that will show build parameters that will be published in pom.xml will be shown.

convert_to_Maven_Project_Eclipse_1

Step 3: Add dependencies to pom.xml

Open pom.xml and Click on Dependencies tab.

Lets try to add log4j.jar as a dependency in pom.xml.

convert_to_Maven_Project_Eclipse_3

convert_to_Maven_Project_Eclipse_4

Step 4: Run Maven Build

Run Maven build by right clicking on pom.xml and selecting Run As -> Maven install.

convert_to_Maven_Project_Eclipse_5

Step 5: Verify Build

You will see that folder is created with naming convention <artifactId>-<version> in build folder. Also you will see that all dependencies are saved to build/<artifactId>-<version>/WEB-INF/lib folder. Also you will see all dependecies are placed in build path under Maven Dependencies.

convert_to_Maven_Project_Eclipse_6


convert_to_Maven_Project_Eclipse_7

Multiple dependencies can be added in similar fashion.


Step by Step guide for Hello World Page (HTML and JSP)

This post has been moved to http://srinichekuri.com/2016/01/14/step-by-step-guide-for-hello-world-html-and-jsp/

**********************************************************************

This post is a step by step guide to develop your first html and jsp. Traditionally, developers code ‘Hello World !!!’ as first page and I am sticking to this tradition.

I am using a Eclipse IDE and Apache Tomcat for this tutorial. I recommend going through ‘Step by Step guide to configure Eclipse and Apache Tomcat‘ before you proceed any further.

Step-1: Create Dynamic Web Application

Create a new Dynamic Web Project by clicking on FIle -> New -> Dynamic Web Project

dynamic_project.png

Give a project name and click on Finish.

dynamic_project_1

Step-2: Create a HTML page

Create a new html page by right clicking on WebContent and selecting New -> HTML File.

dynamic_project_2.png

Put in a filename helloWorld.html and click on Finish.

dynamic_project_3.png

Put in this code in helloWorld.html.

<!DOCTYPE html>
<html>
<head>
 <meta charset="ISO-8859-1">
 <title>Hello World</title>
</head>
<body>
 <h5>Hello World - html</h5>
</body>
</html>

Step-3: Create a JSP page

Create a new jsp page by right clicking on WEB-INF and selecting New -> JSP File.

dynamic_project_9


Put in a filename helloWorld.jsp and click on Finish.

dynamic_project_10


You are seeing any compilation errors then make sure that you have right Runtimes checked as shown below.

dynamic_project_5_1

Put in below code into the jsp.

<%@ page language="java" contentType="text/html; charset=ISO-8859-1"
 pageEncoding="ISO-8859-1"%>
<!DOCTYPE html PUBLIC "-//W3C//DTD HTML 4.01 Transitional//EN" "http://www.w3.org/TR/html4/loose.dtd">
<html>
<head>
<meta http-equiv="Content-Type" content="text/html; charset=ISO-8859-1">
<title>Hello World</title>
</head>
<body>
<h5>Hello World - jsp</h5>
</body>
</html>

Step-4: Add Project to Server.

Add Project server to Server.

dynamic_project_5_2

dynamic_project_5_3.png

Step-5: Access new pages.

Access html page by url in browser. Url will be in “http://localhost:<port>/HelloWorld/helloWorld.html&#8221; format

dynamic_project_6.png

Access jsp page by url in browser. Url will be in “http://localhost:<port>/HelloWorld/helloWorld.jsp&#8221; format

dynamic_project_7.png


Step by Step guide to configure Eclipse and Apache Tomcat

This post has been moved to http://srinichekuri.com/2016/01/12/step-by-step-guide-to-configure-eclipse-and-apache-tomcat/

*********************************************************************

Eclipse is a very commonly used IDE by developers across the globe. Eclipse with Apache Tomcat server is a great combination for beginners and for experienced web developers.

This post will provide step-by-step guidance to set up Eclipse with Tomcat Server.

Note: Below screen shots are for windows 64-bit version. Please act accordingly for 32-bit versions.

Step-1: Download Java.

Click Here to download Java 7 SDK.

Java7_download

You will see that there are two folder created in your C:\Program files\Java. (In my case I already had Java 6 installed too).

Java7_download_2

Step-2: Download Apache Tomcat Server

Click Here to download Apache Tomcat Server 7.

Apache_Tomcat7_download

Once dowloaded, extract the server to D:\Software. You will see following structure after the extract is complete.

Apache_Tomcat7_download_1

Note: you can also choose to install from 32-bit/64-bit Windows Service Installer if you want to install it like a service.

Step-3: Configure Environment Variables

Configure following environment variables and restart your pc when done.

  • JAVA_HOME: “C:\Program Files\Java\jdk1.7.0_79”java_home_environment_variable
  • JRE_HOME: “C:\Program Files\Java\jre7”jre_home_environment_variable
  • CATALINA_HOME: “D:\Software\apache-tomcat-7.0.67”catalina_home_environment_variable


Step-4: Download Eclipse

Click Here to download Eclipse. For this guide, I am downloading Eclipse Mars. But you can download anything that is compatible with Java version you downloaded.

Eclipse_Mars_Download

Once downloaded extract contents to D:\Software.  You will see following structure after download is complete.

Eclipse_Mars_Download_1


Step 5: Setup Server Configuration in Eclipse

Open Eclipse and Open Server View (Window -> Show View -> Servers)

Right Click New -> Server

Eclipse_server_setup

Select Tomcat 7. You might have to Add Server runtime environment.

Eclipse_server_setup_1

(Dialog when clicked on ‘Add…’ in above screen shot)

Eclipse_server_setup_2

Click on Finish when Done.

Double click on Server to open deployment descriptor and make sure that you have default ports.

Eclipse_server_setup_3

Now start the server by clicking on start button and you will see that server has started successfully.

Eclipse_server_setup_4

Eclipse_server_setup_5

Hope this Set up process was helpful. Please use the comment section if you face any issues setting up and I will help  you as soon as I can.


Select2 – Jquery Plugin – examples

This post has been moved to http://srinichekuri.com/2016/01/09/select2-jquery-plugin/

**********************************************************************

Select2 is famous Jquery plugin that allows customization of select component with support for searching, tagging, remote data sets, infinite scrolling etc.

I had a chance to work on select2 plugin off late and I was able to use it with using various options. I faced some serious issues while working on these options and realized that there were lot of developers who inquired on web on how to use select2 in these scenarios but there are no proper responses/documentation with examples for these scenarios.

Below are the various examples for select2 that I have published.
Select2 3.5.2 version was used for below examples. Be advised to read through specs before you process any further.

Below are Select2 Parameters that I have used for examples :

  • minimumInputLength: minimum number of characters before starting a search.    Eg: 2.
  • minimumResultsForSearch: limit on the results to be displayed.
  • placeHolder: Place holder to be shown when there are no selections made.           Eg: ‘Select Employee’
  • tokenSeparators: Character set that can be used as delimeters to enter multiple values. Eg: [‘,’]
  • Multiple: Boolean value to indicate if multiple values can be selected
  • Id: function used to get id from the object that is selected
  • Ajax: Option to be used for built in ajax query selection.
    • url: url to make ajax call.
    • datatype: data type of request. Eg: ‘json’
    • params: Extra paramters to be passed on in request. Eg: ‘{contentType: “application/json”}’
    • data: query parameters for ajax request
    • results: builds query result object from ajax response.
  • formatSelection: format the selection that is shown.
  • formatResult:  Function used to render a result that is shown to user for selection. Eg: results that are shown in dropdown.

Select2 – Tags (Click Here for working code):
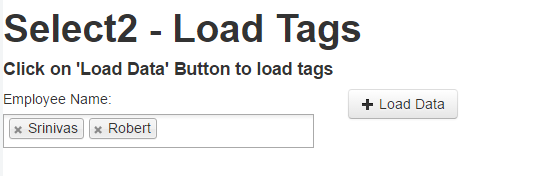
select2_ajax_tags_selections


&lt;div id=&quot;maincontainer&quot; class=&quot;clearfix&quot;&gt;
    &lt;!-- main content s--&gt;
    &lt;div id=&quot;contentwrapper&quot;&gt;
        &lt;div class=&quot;main_content&quot;&gt;
            &lt;div class=&quot;row-fluid&quot;&gt;
                &lt;div class=&quot;span6&quot; id=&quot;employeeColumn&quot;&gt;
                    &lt;div class=&quot;control-group&quot;&gt;
                        &lt;label class=&quot;control-label&quot;&gt;Employee Name: &lt;/label&gt;
                        &lt;div class=&quot;controls&quot;&gt;
                            &lt;input type=&quot;text&quot; class=&quot;tags&quot; id=&quot;select2_tags_id&quot; /&gt;
                        &lt;/div&gt;
                    &lt;/div&gt;
                    &lt;!--control group --&gt;
                &lt;/div&gt;
                &lt;!-- Employee Column --&gt;
                &lt;button id=&quot;loadDataButton&quot; class=&quot;btn&quot; type=&quot;submit&quot;&gt;&lt;i class=&quot;icon-plus&quot; alt=&quot;OK&quot;&gt;&lt;/i&gt; Load Data &lt;/button&gt;
            &lt;/div&gt;
            &lt;!-- row-fluid --&gt;
        &lt;/div&gt;
        &lt;!-- main_content --&gt;
    &lt;/div&gt;
    &lt;!-- content wrapper --&gt;
&lt;/div&gt;

Java script for Select2 Tags.

$(document).ready(function() {
    $('#select2_tags_id').select2({
        tokenSeparators: [','],
        tags: true,
        maximumSelectionSize: 10,
        minimumResultsForSearch: Infinity,
        multiple: true,
        dropdownCss: {
            display: 'none'
        }
    });

    $('#loadDataButton').on('click', function() {
        $('#select2_tags_id').select2('val', ['Srinivas', 'Robert']);
    });
});


Select2 – Ajax – Single Selection (Click Here for working code):

select2_ajax_single_selections


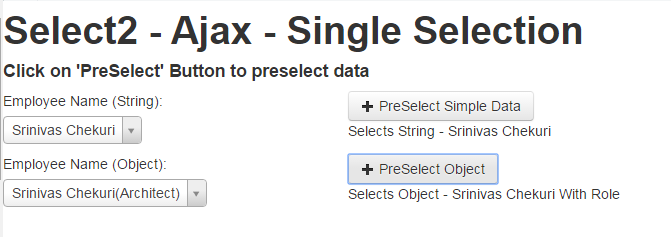
Below code is for dynamic search using Ajax and for single selection.

&lt;div id=&quot;maincontainer&quot; class=&quot;clearfix&quot;&gt;
    &lt;!-- main content s--&gt;
    &lt;div id=&quot;contentwrapper&quot;&gt;
        &lt;div class=&quot;main_content&quot;&gt;
            &lt;div class=&quot;row-fluid&quot;&gt;
                &lt;div class=&quot;span6&quot; id=&quot;employeeColumn&quot;&gt;
                    &lt;div class=&quot;control-group&quot;&gt;
                        &lt;label class=&quot;control-label&quot;&gt;Employee Name (String): &lt;/label&gt;
                        &lt;div class=&quot;controls&quot;&gt;
                            &lt;input type=&quot;text&quot; id=&quot;select2_ajax_simple_id&quot; /&gt;
                        &lt;/div&gt;
                    &lt;/div&gt;
                    &lt;!--control group --&gt;
                &lt;/div&gt;
                &lt;!-- Employee Column --&gt;
                &lt;button id=&quot;preselectSimpleDataButton&quot; class=&quot;btn&quot; type=&quot;submit&quot;&gt;&lt;i class=&quot;icon-plus&quot; alt=&quot;OK&quot;&gt;&lt;/i&gt; PreSelect Simple Data &lt;/button&gt;
                &lt;label&gt;Selects String - Srinivas Chekuri &lt;/label&gt;
            &lt;/div&gt;
            &lt;!-- row-fluid --&gt;

            &lt;!--Code for Select2 Object --&gt;
            &lt;div class=&quot;row-fluid&quot;&gt;
                &lt;div class=&quot;span6&quot; id=&quot;employeeComplexColumn&quot;&gt;
                    &lt;div class=&quot;control-group&quot;&gt;
                        &lt;label class=&quot;control-label&quot;&gt;Employee Name (Object): &lt;/label&gt;
                        &lt;div class=&quot;controls&quot;&gt;
                            &lt;input type=&quot;text&quot; id=&quot;select2_ajax_complex_id&quot; /&gt;
                        &lt;/div&gt;
                    &lt;/div&gt;
                    &lt;!--control group --&gt;
                &lt;/div&gt;
                &lt;!-- Employee Column --&gt;
                &lt;button id=&quot;preselectObjectDataButton&quot; class=&quot;btn&quot; type=&quot;submit&quot;&gt;&lt;i class=&quot;icon-plus&quot; alt=&quot;OK&quot;&gt;&lt;/i&gt; PreSelect Object&lt;/button&gt;
                &lt;label&gt;Selects Object - Srinivas Chekuri With Role &lt;/label&gt;
            &lt;/div&gt;
            &lt;!-- row-fluid --&gt;
        &lt;/div&gt;
        &lt;!-- main_content --&gt;
    &lt;/div&gt;
    &lt;!-- content wrapper --&gt;
&lt;/div&gt;

Java script for Select2 configuration and selection for simple data (String).

 $('#select2_ajax_simple_id').select2({
            minimumInputLength: 1,
            placeholder: &amp;amp;amp;amp;amp;amp;quot;Search Employee&amp;amp;amp;amp;amp;amp;quot;,
            //data:o,
            id: function(i) {
                return i;
            },
            initSelection: function(element, callback) {

            },
            ajax: {
                type: 'post',
                url: &amp;amp;amp;amp;amp;amp;quot;/echo/json/&amp;amp;amp;amp;amp;amp;quot;,
                allowClear: true,
                dataType: 'json',
                delay: 250,
                params: {
                    contentType: &amp;amp;amp;amp;amp;amp;quot;application/json&amp;amp;amp;amp;amp;amp;quot;
                },
                data: function(term, page) {
                    //Code for dummy ajax response
                    return {
                        json: simple_employee_response,
                        delay: 0
                    };
                },
                results: function(data, page) {
                    return {
                        results: data
                    };
                },
                cache: false
            },
            formatResult: function(i) {
                return ' &amp;amp;amp;amp;amp;amp;lt; div &amp;amp;amp;amp;amp;amp;gt; '+i+' &amp;amp;amp;amp;amp;amp;lt; /div&amp;amp;amp;amp;amp;amp;gt;

                '; }, // Formats results in drop down
                formatSelection: function(i) {
                    return ' &amp;amp;amp;amp;amp;amp;lt; div &amp;amp;amp;amp;amp;amp;gt; '+i+' &amp;amp;amp;amp;amp;amp;lt; /div&amp;amp;amp;amp;amp;amp;gt;

                    '; }, //Formats result that is selected
                    dropdownCssClass: &amp;amp;amp;amp;amp;amp;quot;bigdrop&amp;amp;amp;amp;amp;amp;quot;, // apply css that makes the dropdown taller
                        escapeMarkup: function(m) {
                            return m;
                        } // we do not want to escape markup since we are displaying html in results
                });

Java script for Select2 configuration and selection based on Objects.
Note: Html is the same as shown above.

$('#select2_ajax_complex_id').select2({
            minimumInputLength: 1,
            placeholder: &amp;amp;amp;amp;amp;amp;quot;Search Employee&amp;amp;amp;amp;amp;amp;quot;,
            //data:o,
            id: function(i) {
                return i;
            },
            initSelection: function(element, callback) {

            },
            ajax: {
                type: 'post',
                url: &amp;amp;amp;amp;amp;amp;quot;/echo/json/&amp;amp;amp;amp;amp;amp;quot;,
                allowClear: true,
                dataType: 'json',
                delay: 250,
                params: {
                    contentType: &amp;amp;amp;amp;amp;amp;quot;application/json&amp;amp;amp;amp;amp;amp;quot;
                },
                data: function(term, page) {
                    //Code for dummy ajax response
                    return {
                        json: complex_employee_response,
                        delay: 0
                    };
                },
                results: function(data, page) {
                    return {
                        results: data
                    };
                },
                cache: false
            },
            formatResult: function(i) {
                return ' &amp;amp;amp;amp;amp;amp;lt; div &amp;amp;amp;amp;amp;amp;gt; '+i.name+' ('+i.role+')
                '+' &amp;amp;amp;amp;amp;amp;lt; /div&amp;amp;amp;amp;amp;amp;gt;

                '; }, // Formats results in drop down
                formatSelection: function(i) {
                    return ' &amp;amp;amp;amp;amp;amp;lt; div &amp;amp;amp;amp;amp;amp;gt; '+i.name+' ('+i.role+')
                    '+' &amp;amp;amp;amp;amp;amp;lt; /div&amp;amp;amp;amp;amp;amp;gt;

                    '; }, //Formats result that is selected
                    dropdownCssClass: &amp;amp;amp;amp;amp;amp;quot;bigdrop&amp;amp;amp;amp;amp;amp;quot;, // apply css that makes the dropdown taller
                        escapeMarkup: function(m) {
                            return m;
                        } // we do not want to escape markup since we are displaying html in results
                })

                $('#preselectSimpleDataButton').on('click', function() {
                // alert('I am here');
                $('#select2_ajax_simple_id').select2('data', 'Srinivas Chekuri');
            });

            $('#preselectObjectDataButton').on('click', function() {
                // alert('I am here');
                var o = new Object;
                o.id = &amp;amp;amp;amp;amp;amp;quot;1&amp;amp;amp;amp;amp;amp;quot;;
                o.name = &amp;amp;amp;amp;amp;amp;quot;Srinivas Chekuri&amp;amp;amp;amp;amp;amp;quot;;
                o.role = &amp;amp;amp;amp;amp;amp;quot;Architect&amp;amp;amp;amp;amp;amp;quot;;
                $('#select2_ajax_complex_id').select2('data', o);
            });

Select2 – Ajax – Single Selection (Click Here for working code):

select2_ajax_multiple_selections


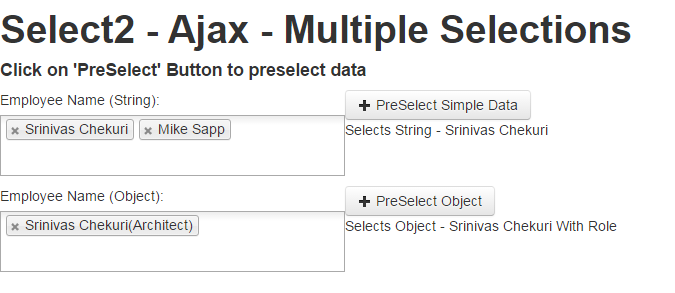
Below code is for dynamic search using Ajax and to have multiple selections.

&lt;div id=&quot;maincontainer&quot; class=&quot;clearfix&quot;&gt;
    &lt;!-- main content s--&gt;
    &lt;div id=&quot;contentwrapper&quot;&gt;
        &lt;div class=&quot;main_content&quot;&gt;
            &lt;div class=&quot;row-fluid&quot;&gt;
                &lt;div class=&quot;span6&quot; id=&quot;employeeColumn&quot;&gt;
                    &lt;div class=&quot;control-group&quot;&gt;
                        &lt;label class=&quot;control-label&quot;&gt;Employee Name (String): &lt;/label&gt;
                        &lt;div class=&quot;controls&quot;&gt;
                            &lt;input type=&quot;text&quot; class=&quot;tags&quot; id=&quot;select2_ajax_simple_id&quot; /&gt;
                        &lt;/div&gt;
                    &lt;/div&gt;
                    &lt;!--control group --&gt;
                &lt;/div&gt;
                &lt;!-- Employee Column --&gt;
                &lt;button id=&quot;preselectSimpleDataButton&quot; class=&quot;btn&quot; type=&quot;submit&quot;&gt;&lt;i class=&quot;icon-plus&quot; alt=&quot;OK&quot;&gt;&lt;/i&gt; PreSelect Simple Data &lt;/button&gt;
                &lt;label&gt;Selects String - Srinivas Chekuri &lt;/label&gt;
            &lt;/div&gt;
            &lt;!-- row-fluid --&gt;

            &lt;!--Code for Select2 Object --&gt;
            &lt;div class=&quot;row-fluid&quot;&gt;
                &lt;div class=&quot;span6&quot; id=&quot;employeeComplexColumn&quot;&gt;
                    &lt;div class=&quot;control-group&quot;&gt;
                        &lt;label class=&quot;control-label&quot;&gt;Employee Name (Object): &lt;/label&gt;
                        &lt;div class=&quot;controls&quot;&gt;
                            &lt;input type=&quot;text&quot; class=&quot;tags&quot; id=&quot;select2_ajax_complex_id&quot; /&gt;
                        &lt;/div&gt;
                    &lt;/div&gt;
                    &lt;!--control group --&gt;
                &lt;/div&gt;
                &lt;!-- Employee Column --&gt;
                &lt;button id=&quot;preselectObjectDataButton&quot; class=&quot;btn&quot; type=&quot;submit&quot;&gt;&lt;i class=&quot;icon-plus&quot; alt=&quot;OK&quot;&gt;&lt;/i&gt; PreSelect Object&lt;/button&gt;
                &lt;label&gt;Selects Object - Srinivas Chekuri With Role &lt;/label&gt;
            &lt;/div&gt;
            &lt;!-- row-fluid --&gt;
        &lt;/div&gt;
        &lt;!-- main_content --&gt;
    &lt;/div&gt;
    &lt;!-- content wrapper --&gt;
&lt;/div&gt;

Java script for Select2 configuration and selection for simple data (Strings) with multiple selections.

 $('#select2_ajax_simple_id').select2({
    tags: true,
    maximumSelectionSize: 10,
    minimumResultsForSearch: Infinity,
    multiple: true,
    minimumInputLength: 1,
    placeholder: &amp;amp;amp;amp;amp;amp;quot;Search Employee&amp;amp;amp;amp;amp;amp;quot;,
    //data:o,
    id: function(i) {
        return i;
    },
    initSelection: function(element, callback) {

    },
    ajax: {
        type: 'post',
        url: &amp;amp;amp;amp;amp;amp;quot;/echo/json/&amp;amp;amp;amp;amp;amp;quot;,
        allowClear: true,
        dataType: 'json',
        delay: 250,
        params: {
            contentType: &amp;amp;amp;amp;amp;amp;quot;application/json&amp;amp;amp;amp;amp;amp;quot;
        },
        data: function(term, page) {
            //Code for dummy ajax response
            return {
                json: simple_employee_response,
                delay: 0
            };
        },
        results: function(data, page) {
            return {
                results: data
            };
        },
        cache: false
    },
    formatResult: function(i) {
        return ' &amp;amp;amp;amp;amp;amp;lt; div &amp;amp;amp;amp;amp;amp;gt; ' + i + ' &amp;amp;amp;amp;amp;amp;lt; /div&amp;amp;amp;amp;amp;amp;gt;

        ';
    }, // Formats results in drop down
    formatSelection: function(i) {
        return ' &amp;amp;amp;amp;amp;amp;lt; div &amp;amp;amp;amp;amp;amp;gt; ' + i + ' &amp;amp;amp;amp;amp;amp;lt; /div&amp;amp;amp;amp;amp;amp;gt;

        ';
    }, //Formats result that is selected
    dropdownCssClass: &amp;amp;amp;amp;amp;amp;quot;bigdrop&amp;amp;amp;amp;amp;amp;quot;, // apply css that makes the dropdown taller
    escapeMarkup: function(m) {
            return m;
        } // we do not want to escape markup since we are displaying html in results
});

$('#preselectSimpleDataButton').on('click', function() {
    $('#select2_ajax_simple_id').select2('data', ['Srinivas Chekuri']);
});

Java script for Select2 configuration and selection based on Objects.
Note: Html is the same as shown above.

 $('#select2_ajax_complex_id').select2({
    tags: true,
    maximumSelectionSize: 10,
    minimumResultsForSearch: Infinity,
    multiple: true,
    minimumInputLength: 1,
    placeholder: &amp;amp;amp;amp;amp;amp;quot;Search Employee&amp;amp;amp;amp;amp;amp;quot;,
    //data:o,
    id: function(i) {
        return i;
    },
    initSelection: function(element, callback) {

    },
    ajax: {
        type: 'post',
        url: &amp;amp;amp;amp;amp;amp;quot;/echo/json/&amp;amp;amp;amp;amp;amp;quot;,
        allowClear: true,
        dataType: 'json',
        delay: 250,
        params: {
            contentType: &amp;amp;amp;amp;amp;amp;quot;application/json&amp;amp;amp;amp;amp;amp;quot;
        },
        data: function(term, page) {
            //Code for dummy ajax response
            return {
                json: complex_employee_response,
                delay: 0
            };
        },
        results: function(data, page) {
            return {
                results: data
            };
        },
        cache: false
    },
    formatResult: function(i) {
        return ' &amp;amp;amp;amp;amp;amp;lt; div &amp;amp;amp;amp;amp;amp;gt; ' + i.name + ' (' + i.role + ')
        ' + ' &amp;amp;amp;amp;amp;amp;lt; /div&amp;amp;amp;amp;amp;amp;gt;

        ';
    }, // Formats results in drop down
    formatSelection: function(i) {
        return ' &amp;amp;amp;amp;amp;amp;lt; div &amp;amp;amp;amp;amp;amp;gt; ' + i.name + ' (' + i.role + ')
        ' + ' &amp;amp;amp;amp;amp;amp;lt; /div&amp;amp;amp;amp;amp;amp;gt;

        ';
    }, //Formats result that is selected
    dropdownCssClass: &amp;amp;amp;amp;amp;amp;quot;bigdrop&amp;amp;amp;amp;amp;amp;quot;, // apply css that makes the dropdown taller
    escapeMarkup: function(m) {
            return m;
        } // we do not want to escape markup since we are displaying html in results
})

$('#preselectObjectDataButton').on('click', function() {
    var _array = []
    var o = new Object;
    o.id = &amp;amp;amp;amp;amp;amp;quot;1&amp;amp;amp;amp;amp;amp;quot;;
    o.name = &amp;amp;amp;amp;amp;amp;quot;Srinivas Chekuri&amp;amp;amp;amp;amp;amp;quot;;
    o.role = &amp;amp;amp;amp;amp;amp;quot;Architect&amp;amp;amp;amp;amp;amp;quot;;
    _array.push(o);
    $('#select2_ajax_complex_id').select2('data', _array);
});

Expanding root of tree in flex

This post is moved to http://srinichekuri.com/2014/02/21/expanding-root-of-tree-in-flex/

**********************************************************************

If you ever want to expand a tree (<mx:Tree>) immediately after setting dataprovider then follow this procedure. The challenge here is tree will not be ready to expand as it takes sometime for it to set data and render.

One common suggestion found on web is to use callLater() to call a function that has code to expand tree. This didn’t work for me (possibly because my code ran into same issue that I highlighted above). But following below method should definetly work as validateNow() method will make sure that all properties are set and will get the tree ready before expanding.

myTree.validateNow();
myTree.expandChildrenOf(_xml,true);

Cannot use javahl, JavaSVN nor command line svn client

This post has been moved to http://srinichekuri.com/2014/02/14/cannot-use-javahl-javasvn-nor-command-line-svn-client/

*********************************************************************

I was working on a old project that had all build files that were working fine when coded originally. I tried using the same files and I ran into this issue.

Error: Cannot use javahl, JavaSVN nor command line svn client

Research:
I have googled on this and I was able to find two feasible solutions that apparently worked for others.

  1. javahl.dll or svnjavahl.dll files have to be appended to PATH variable. This solution didn’t work for me. First of all I didn’t find these files and even if would have found them, I wouldn’t have done it as changing PATH variable was not an option for me.
  2. Download a svn client like silksvn and install it. This will put in a PATH variable which will in turn help fixing the issue. This was not an option either as I was not willing to install a software for something that was supposed to work stand alone.

Solution:
After multiple trails this is what worked for me.

  • I downloaded the latest SvnAnt (svn 1.2.x at time of documentation).
  • I replaced svnant.jar, svnClientAdapter.jar, svnjavahl.jar files that were preexisiting and added svnkit.jar.
  • Add these files to classpath in ant script. (No changes done to PATH variables or any other system level variable)
&lt;typedef resource=&quot;org/tigris/subversion/svnant/svnantlib.xml&quot;&gt;
 &lt;classpath&gt;
 &lt;pathelement location=&quot;C:/svnAnt/lib/svnant.jar&quot;/&gt;
 &lt;pathelement location=&quot;C:/svnAnt/lib/svnClientAdapter.jar&quot;/&gt;
 &lt;pathelement location=&quot;C:/svnAnt/lib/svnjavahl.jar&quot;/&gt;
 &lt;pathelement location=&quot;C:/svnAnt/lib/svnkit.jar&quot;/&gt;
 &lt;/classpath&gt;
 &lt;/typedef&gt;

Hope this helps!!!